HAL: Building the poor man’s smarthome
As a kid, I thought it would be awesome to own a smart home. In 2009, I decided to make that dream a reality and started on the project. For the past three years, I have built on it and I now present a comprehensive guide to automating your home on the cheap. I call my system HAL, after the evil computer from “2001: A Space Odyssey,” and as an abbreviation for Home Automation with Linux.
My requirements for it were as follows:
- It must be Linux-based.
- It must know when any door or window is opened/closed, when the front door is locked/unlocked, and when the doorbell is rung.
- It must be able to send text messages (in the event of intrusion, doorbell ringing, power outage, etc).
- The main computer must be able to remain online during a power outage.
- It must use a minimum amount of power.
- It must allow me to turn lights on and off with my phone.
- It must be able to be implemented for under $500.
- It must know when I am home or away.
Some future ideas:
- It would be awesome if it was voice-controlled.
- An intercom system, maybe one I could call into from my cell phone.
- A CCTV system.
- An aquarium filled with sharks that have lasers.

1. Choosing the computer
To meet the requirements of being Linux-based and using a minimum amount of power, I knew I would need a plug computer that used a low-power ARM processor. After some research, I found the perfect one.
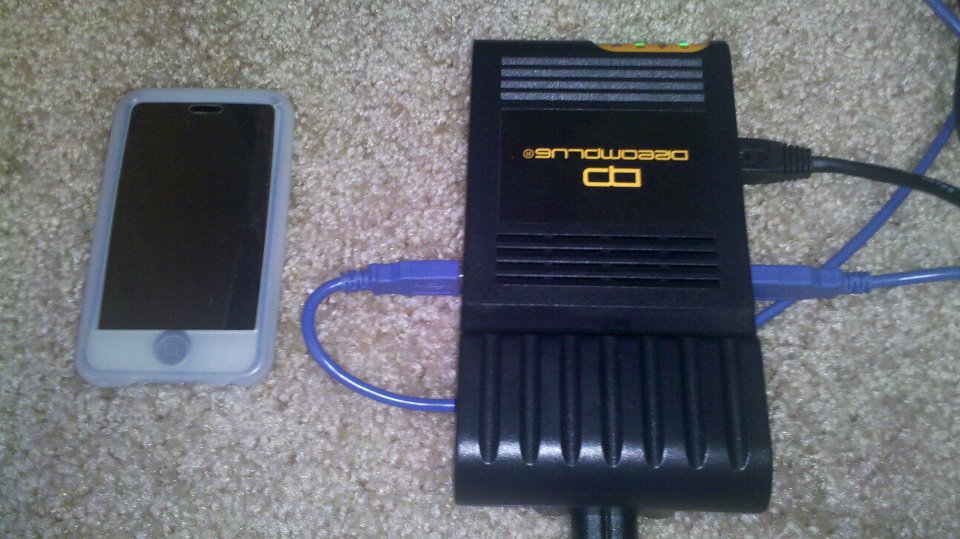
The DreamPlug ($160) is a tiny, embedded ARM plug computer that sips power at 5W, has 2 USB ports, 2 Ethernet ports, 4GB of Flash-based storage space, and runs a Debian OS (the new one runs Ubuntu).
2. Choosing the hardware
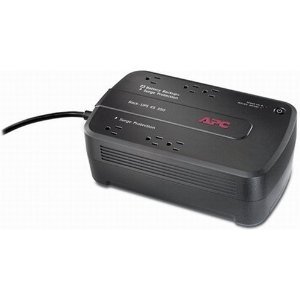
Solving the problem of having the computer stay online during a power outage was a simple matter of buying a Uninterruptible Power Supply (UPS). I bought an APC BE350G that suited my needs on Amazon for $50.
Pro tip: You can hook up a car battery to one of these. This can be extremely dangerous because lead-acid batteries can produce hydrogen gas, so it must be in a well-ventilated area. If you take the proper precautions, this can power a computer for up to 48 hours on its own. For more on this, check out this how-to video.
For this computer to monitor doors and windows, and send out commands to turn on and off lights, I knew I needed a network of sensors, a transmitter, and a receiver. X10 is a protocol designed for building smarthomes that has been around for over three decades, and Linux developers have written a cornucopia of software and drivers to support it. The fact that it has been around for so long also means that the modules are very cheap. The door and window sensors can be picked up for about $4 each and the lightswitches for about $10. The best and cheapest place to purchase these modules that I found was this eBay store.
To receive messages from the door and window sensors, I picked up a W800RS32A receiver for $75 from here. To receive/transmit messages over the power lines to/from the lightswitches, I bought a CM11A for about $40. Both of these use serial, which was an issue because the DreamPlug computer only supports USB. To connect them to the USB port on the DreamPlug, I bought two RS232-to-USB converters from Amazon for $10 each.
3. Installing the hardware
The lightswitches were a little tricky to install but eventually I was able to connect the correct wires. I am no electrician by any stretch of the imagination so this took a lot of trial-and-error the first time. Definitely take precautions before you do this. Make sure the power is shut off to the lights you are working on. Remember that the white wire is for ground. It may be helpful to mark the cables with colored tape, like I did.

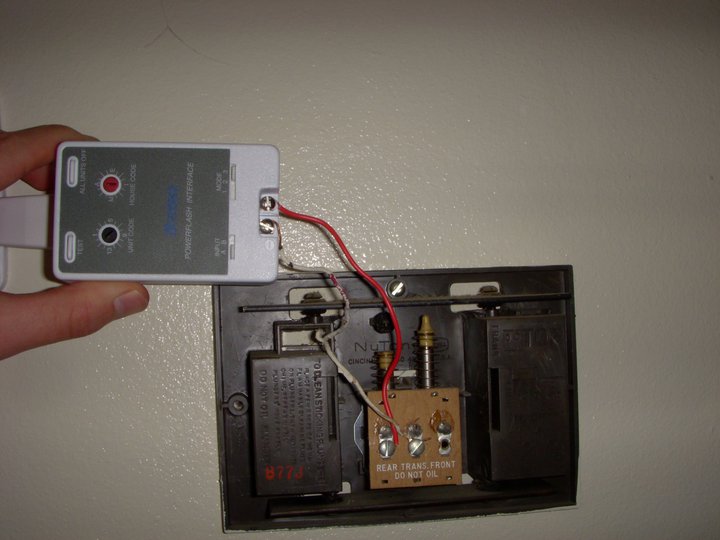
To get the doorbell to transmit signals when rung, I added an extra circuit and connected it to an X10 Powerflash module. This module transmits a signal when the contact is closed. It’s not the most elegant solution to monitoring a doorbell, because it needs to be plugged in to an outlet in order to work. This was, however, the most reliable solution to the problem. I tried using a DS10A and getting the solenoid on the doorbell to close the magnetic switch to trigger a signal, but had limited success. I will post an update if I get it working.
4. The software
With the hardware installed, it’s now time for the fun part.
To communicate with and monitor the W800RS32A and the CM11A, I used heyu. There is extensive documentation on their website, and it is incredibly easy to write scripts that are triggered by input from the X10 sensors.
Controlling the lights from a phone
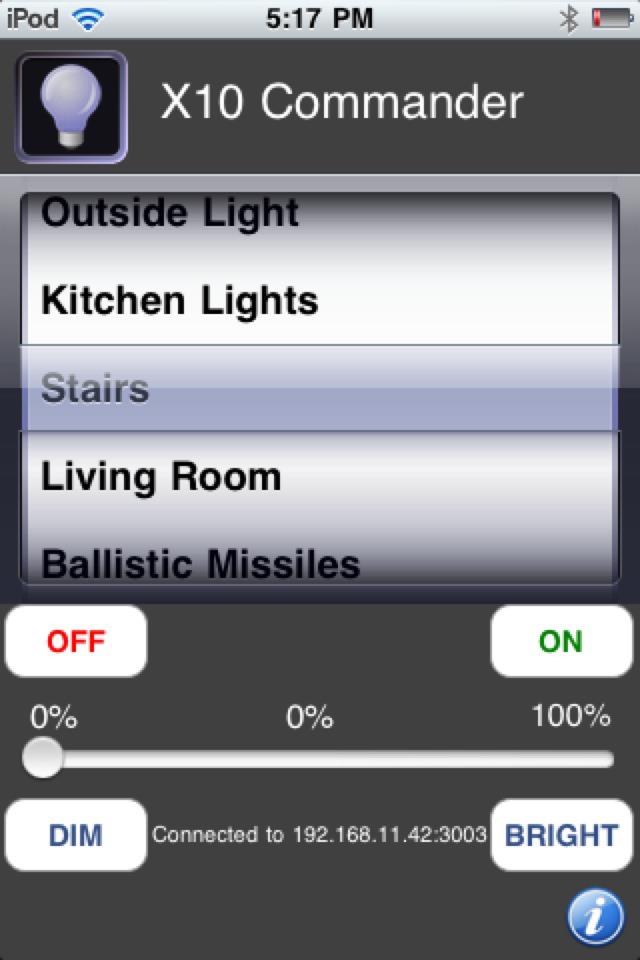
X10 Commander ($10, iPhone and Android) is the perfect way to control your smarthome from your phone for the same price as an X10 module. A how-to guide to setting up the server shell script for the app to communicate with can be found here. To be able to control your lights from anywhere in the world, use DynDNS on your router and forward port 3003 to the address of your DreamPlug.
Determining occupancy status of the house
One of my requirements was that the smarthome must know if I am home or not. To do this, I used the Bluetooth on the DreamPlug to scan for the presence of my phone.
Sending text messages
I looked into various options for sending text messages, all of which charged money per text. To avoid the possibility that a software error might result in thousands of texts being sent out, I knew I needed a free alternative. So I used Twitter.

I created a private Twitter account for my apartment, registered an app with an API key, and used a Python script I found on Google to communicate with Twitter’s API using that key. I then followed my apartment’s Twitter account and chose the “Get updates by SMS” option. Done.
5. In conclusion
I hope that this post has been helpful for you if you are interested in building a smarthome of your own. This is a work in progress and I plan on adding many more pictures, descriptions, and scripts soon.
Comments