Creating an ad hoc VPN on OSX using reverse SSH tunneling and a launch daemon
Are you annoyed by setting up VPNs?
Do you hate SSH port forwarding?
Need to have remote shell access to a Mac from anywhere in the world?
Reverse SSH tunnels to the rescue!
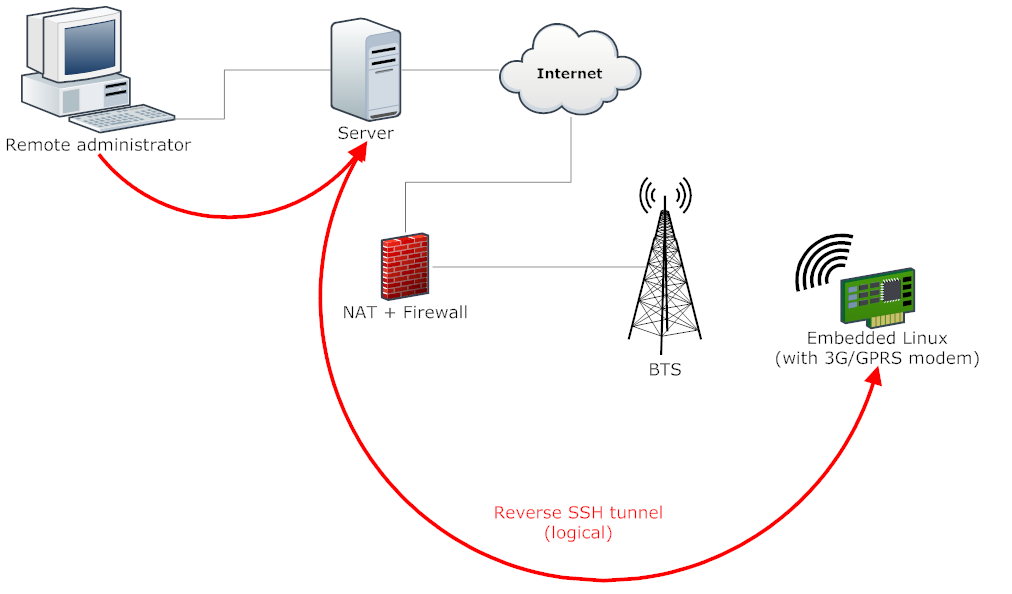
A reverse SSH tunnel is exactly what it sounds like; an SSH tunnel in reverse. Your computer connects to a remote server and then opens up a tunnel back to itself. You can then connect to that server and have access to your machine. This is a very clean way to get around the problem of dealing with NAT traversal and firewalls. No port forwarding necessary.
OSX supports launch daemons. These are processes that start up when you boot up your Mac. It’s simple to use a launch daemon to keep the SSH tunnel alive for remotely accessing the machine anytime. The daemon will reconnect to the server immediately after the event of a connection drop or if your IP address changes.
The Process
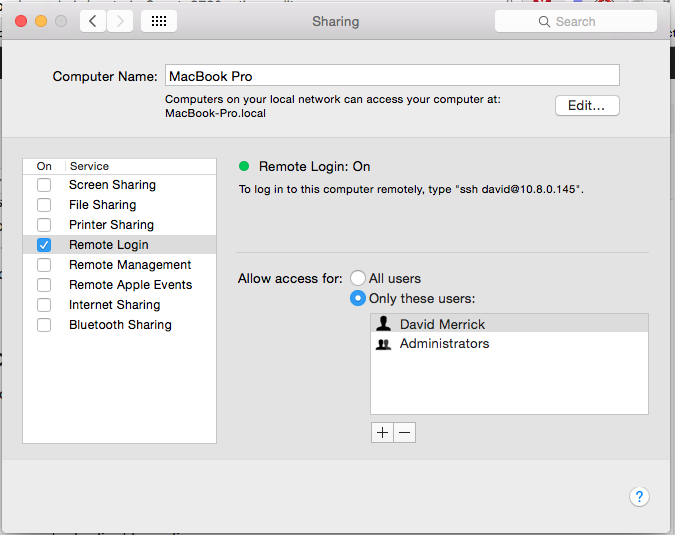
1. Enable SSH on your Mac.
Go to System Preferences -> Sharing. Enable the “Remote Login” checkbox and add your username to the whitelist.
2. Configure the server.
Note: If you need a server, I can’t speak more highly of DigitalOcean. I host this website there and their basic VPS packages start at $5/month.
Setup the server to maintain the connection with a keepalive packet:
server$ echo "ClientAliveInterval 60" | sudo tee -a /etc/ssh/sshd_config
server$ sudo restart ssh
3. Setup SSH Keys.
SSH keys allow you to quickly, securely, and automatically login to a server without a password. If you haven’t already, generate SSH keys on the client and server.
Client:
client$ ssh keygen -t rsaServer:
client$ ssh remoteUser@servername
server$ ssh keygen -t rsa
First, we’ll test out the reverse SSH tunnel to the server. We’ll then use this tunnel to copy the server’s key to the client to enable easy access.
Open up a terminal, and run this command.
client $ ssh -NT -R 12345:localhost:22 remoteUser@servernameOpen a new terminal window, and run these commands to copy the server’s key into your client’s authorized_keys file:
client $ ssh remoteUser@servername
server $ cat ~/.ssh/id_rsa.pub | ssh localUser@localhost -p 12345 'cat >> ~/.ssh/authorized_keys'
(Where “localUser” is the username on your Mac)
You should then be able to log in to your Mac without being prompted for a password.
server$ ssh localUser@localhost -p 12345
client$ Yay!
4. Create the launch daemon on your Mac.
This launch daemon will open the SSH tunnel at startup, keep it alive, and restart it if it dies. For more background on launch daemons, see Apple’s Documentation.
Create a file at /Library/LaunchDaemons/reverse.ssh.tunnel.plist. This file should contain the following:
<?xml version="1.0" encoding="UTF-8"?>
<!DOCTYPE plist PUBLIC "-//Apple Computer//DTD PLIST 1.0//EN" "http://www.apple.com/DTDs/PropertyList-1.0.dtd">
<plist version="1.0">
   <dict>
   <key>Label</key>
   <string>reverse.ssh.tunnel</string>
   <key>ProgramArguments</key>
   <array>
          <string>ssh</string>
          <string>-NTC</string>
          <string>-o ServerAliveInterval=60</string>
          <string>-o ExitOnForwardFailure=yes</string>
          <string>-R 12345:localhost:22</string>
          <string>remoteUser@servername</string>
   </array>
   <key>UserName</key>
   <string>localUser</string>
   <key>RunAtLoad</key>
   <true/>
   <key>KeepAlive</key>
   <true/>
</dict>
</plist>
Here’s an explanation of those option parameters:
-N: Don’t run a remote command. The remote command will fail anyway due to the restrictions imposed by the authorized_keys file. -T: Disable pty allocation, which is unnecessary when only port-forwarding is desired. -C: Request compression. This is optional, but can potentially speed up the connection slightly. -o ServerAliveInterval=60: The client will attempt to send keepalive pings to the server every 60 seconds. -o ExitOnForwardFailure=yes: If port forwarding fails to get setup due to something like another process (or old ssh process) being bound to the hardcoded port, fail and return. -R 12345:localhost:22: Remotely forward the localhost port 22 (sshd) to the server’s port 12345, as shown earlier. remoteuser@servername: Self-explanatory. Connect to servername with user remoteuser. RunAtLoad: Run the daemon at system load time.
5. Load the launch daemon.
client$ sudo launchctl load /Library/LaunchDaemons/reverse.ssh.tunnel.plistAnd you’re good to go! To check if it’s running, you can use:
client$ ps aux | grep sshYou should see a process that looks like:
ssh -NTC -o ServerAliveInterval=60 -o ExitOnForwardFailure=yes -R 12345:localhost:22 remoteUser@servernameReference:
Comments