How I digitized hundreds of old MiniDV tapes
Back in 2001, I saved up my paper route money for several months and bought a Canon ZR30MC camcorder. For the next several years, I brought that camera everywhere and captured hundreds of hours of the lives of my family and friends.
Fast-forward 22 years, and I returned home from a trip to visit my family with that camera and several boxes full of tapes. Thus began my journey into digitizing them.
The hardware
I was surprised to find that MiniDV players are really difficult to come by these days. I was hoping to find a machine that could play back several of them in parallel, so I could capture multiple streams at once and speed up the process, but no dice. The ones I did find were on the order of $300-$500 and could only play a single tape at a time.
Luckily, the camera’s tape deck still worked for playback, so I didn’t need to solve that problem (for now, anyway. Time will tell if the tape heads hold up for the duration of this project 🤞🏼️).
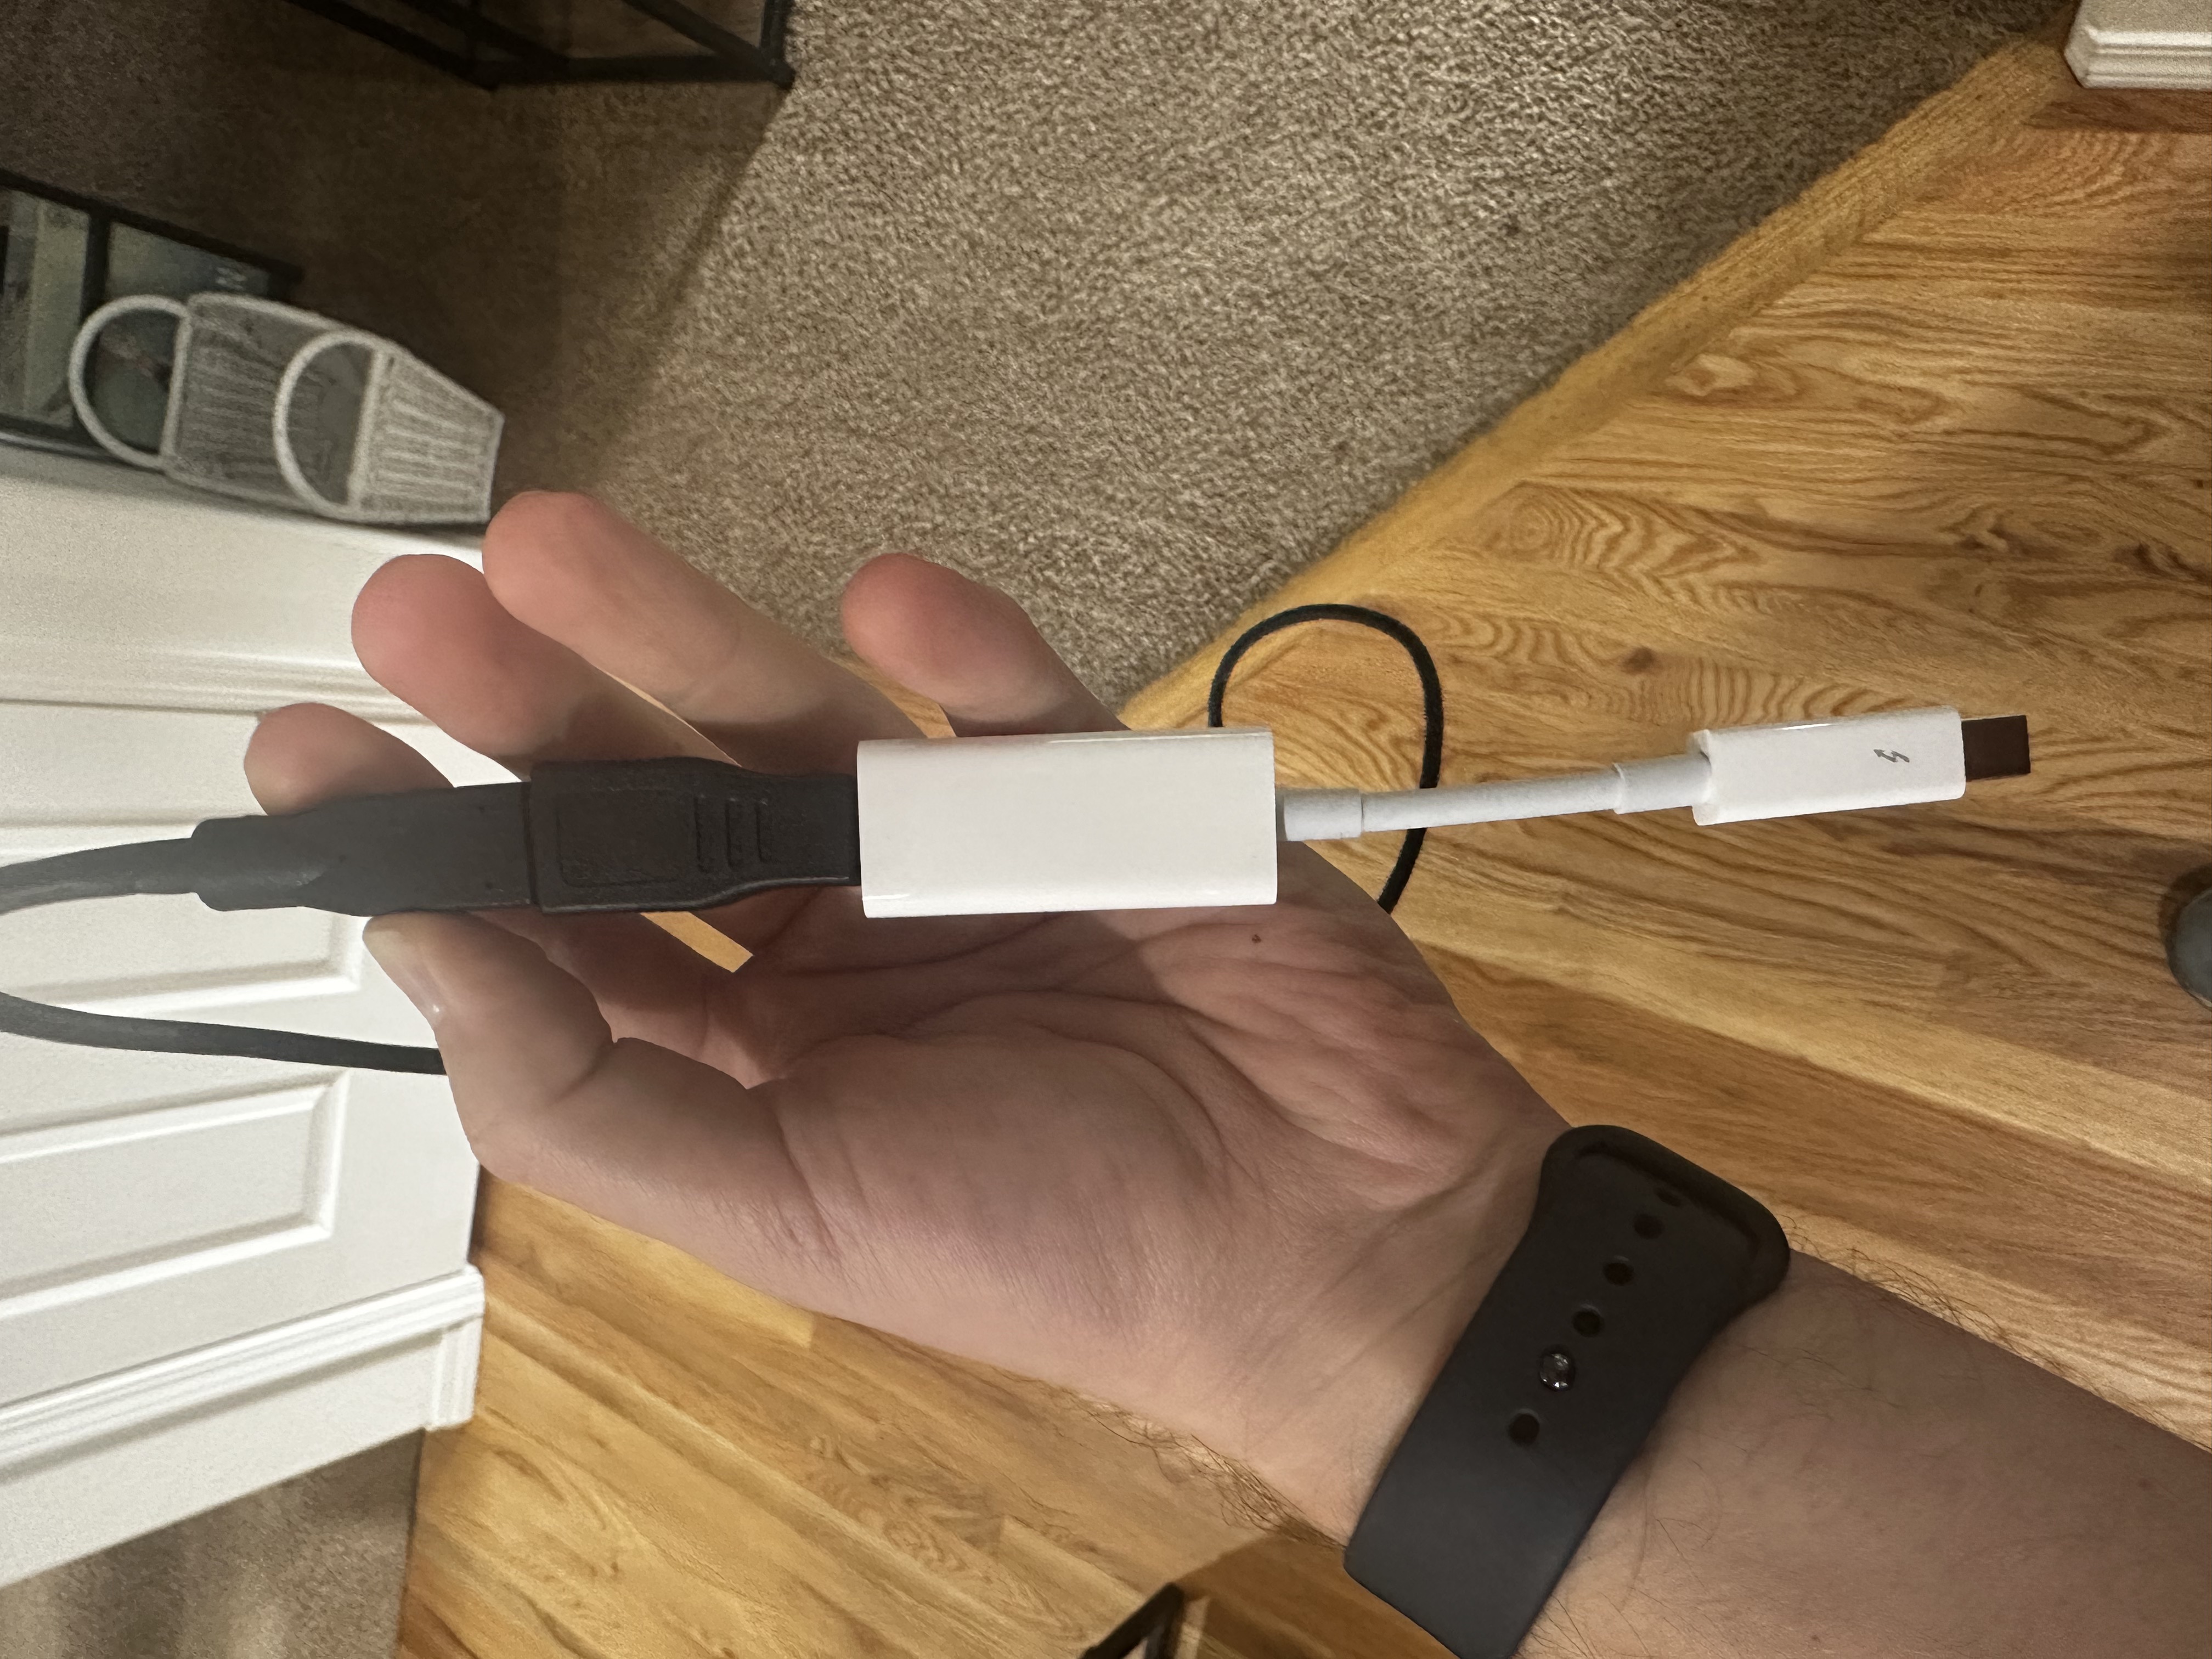
The camera had a 4-pin Firewire 400 connection for output. I ultimately needed to connect that to my 2015 iMac, which takes either USB or Thunderbolt 2 as input.
In subsequent years, before the whole Firewall interface was scrapped, Firewire 800 was introduced as the successor to 400. Luckily, it’s backwards-compatible with 400. So I realized I’d need to convert from Firewire 400 to 800 to Thunderbolt 2.
The cables and adapters I went with:
- Firewire 400 4-pin to 6-pin cable
- Firewire 400 to 800 adapter
- Firewire 800 to Thunderbolt 2 adapter
I was able to find all the cables and converters I needed from B&H.
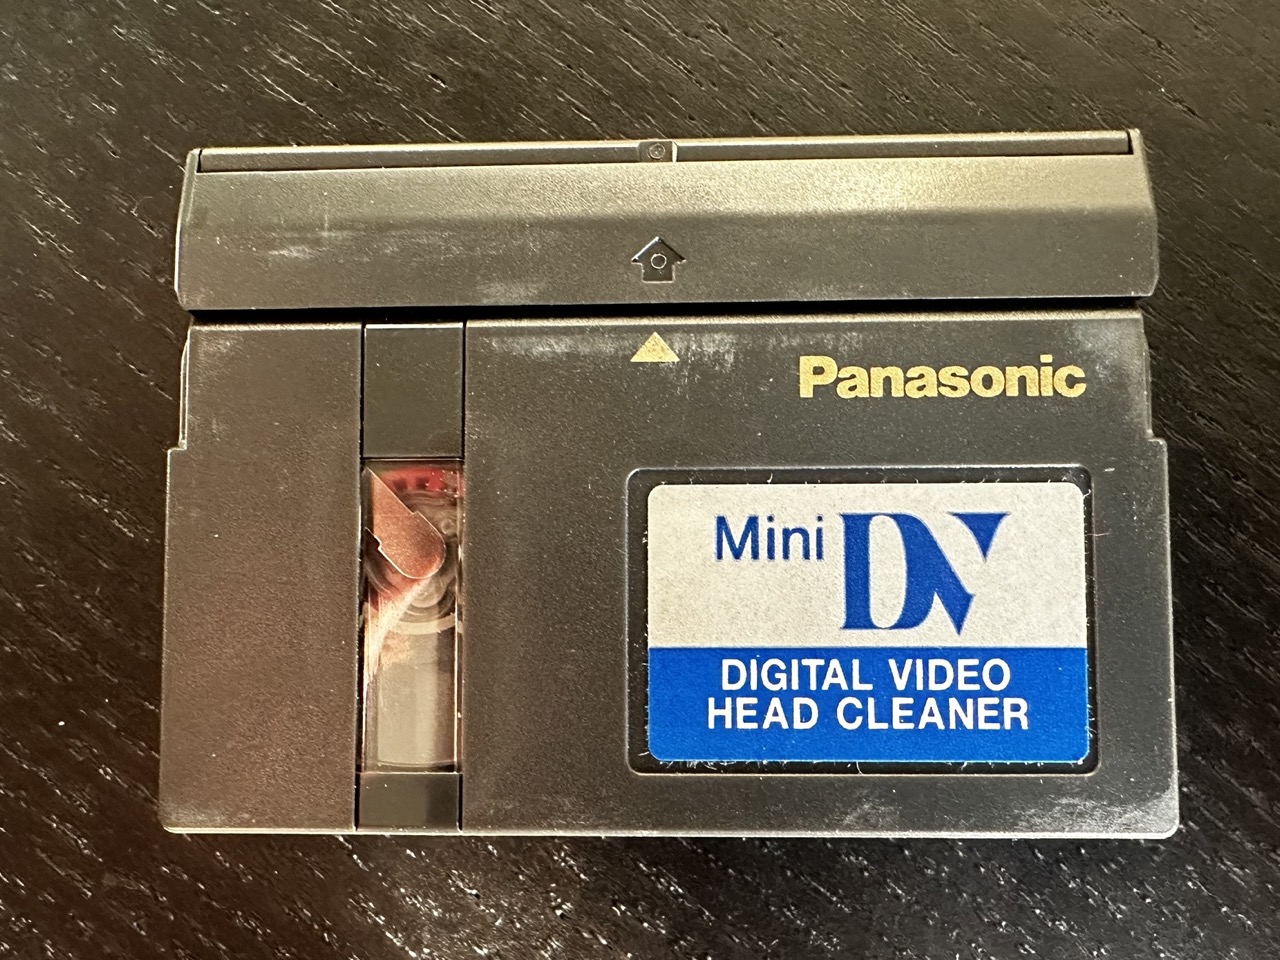
As the process progressed, I realized that the tape heads would get dirty after digitizing 10-20 tapes, resulting in video artifacts and the hardware making squeaking noises as it played back tapes. I was grateful to find that I still have a DV head cleaner. I definitely recommend having one handy. I see a few of them available on eBay for $10-$30.
It’s easy to clean the heads; just pop it in like any other tape and press play for 10 seconds.
The software
This is where things got a little hairy. I was able to get the camera connected to the computer fine, and even could see a video feed via Quicktime. Unfortunately, Quicktime kept pausing recording if there were any gaps on the tape. I tried capturing via Premiere and, while it could control the camera, there was no video output or a way to record it. I subsequently discovered that Premiere just doesn’t support MiniDV at all anymore, as of January 2022.
I was able to get iMovie to capture video, but there was no audio.
🤦🏼♂️️
Then I stumbled across this post by Léo Bernard, who solved a similar problem using a set of open-source tools. In particular:
- ffmpeg-decklink for video capture.
- DV Packager for splitting the video into clips post-capture.
And this worked for me! Both video and audio are now capturing ✅️. The one downside to these tools is that neither of them has a GUI, so they require some terminal commands. If you’re comfortable with that, though, the capture process was pretty straightforward.
For posterity, the commands to set up those tools are:
brew tap amiaopensource/amiaos
brew tap mediaarea/homebrew-mediaarea
brew install ffmpegdecklink dvrescue mediainfo
brew link --force ffmpegdecklink
To use them, list the input devices with:
ffmpeg -f avfoundation -list_devices true -i ""
In my case, I found that the camera was called FV20.
Then, capture the raw DV footage with:
ffmpeg-dl -f avfoundation -capture_raw_data true -i "FV20" -c copy -map 0 -f rawvideo video.dv
I’ve found that an hour of raw DV footage uses up 12-14GB. I’m thinking that I probably won’t re-encode it for storage, as I’ve got plenty of room on my NAS. I’ve got on the order of about 100 tapes to capture, so at worst, that’s 1TB.
There also might be a valid use case for having it raw down the road. I’ve heard of some AI video processors that can upscale footage to 1080p, for example. So I’m intentionally erring on the side of storing more data.
To split the raw footage into clips, use:
dvpackager -e mov -s video.dv
I also found Léo Bernard’s script for prepending dates to the filenames really useful:
for f in *.mov
do
  DATE=$(mediainfo --Output="General;%Recorded_Date%" "$f" | cut -c1-19)
  SAFE_DATE=$(echo "$DATE" | sed -e 's/://g' -e 's/ /_/g')
  mv "$f" "$SAFE_DATE"_"$f"
done
Encoding and exporting
Some of the raw DV clips, even after being split up, ended up being on the order of 5-10 GB. I mentioned earlier that I didn’t mind storing them on disk like this, but uploading many files of that size to Google Photos would take a long time and burn quota there. For smaller files, I didn’t bother, but for larger ones, I decided to encode them.
I’ve been a Handbrake user for many years and decided to use that. Under the hood, it runs ffmpeg, but having the GUI is nice, and you can queue things up for batch processing.
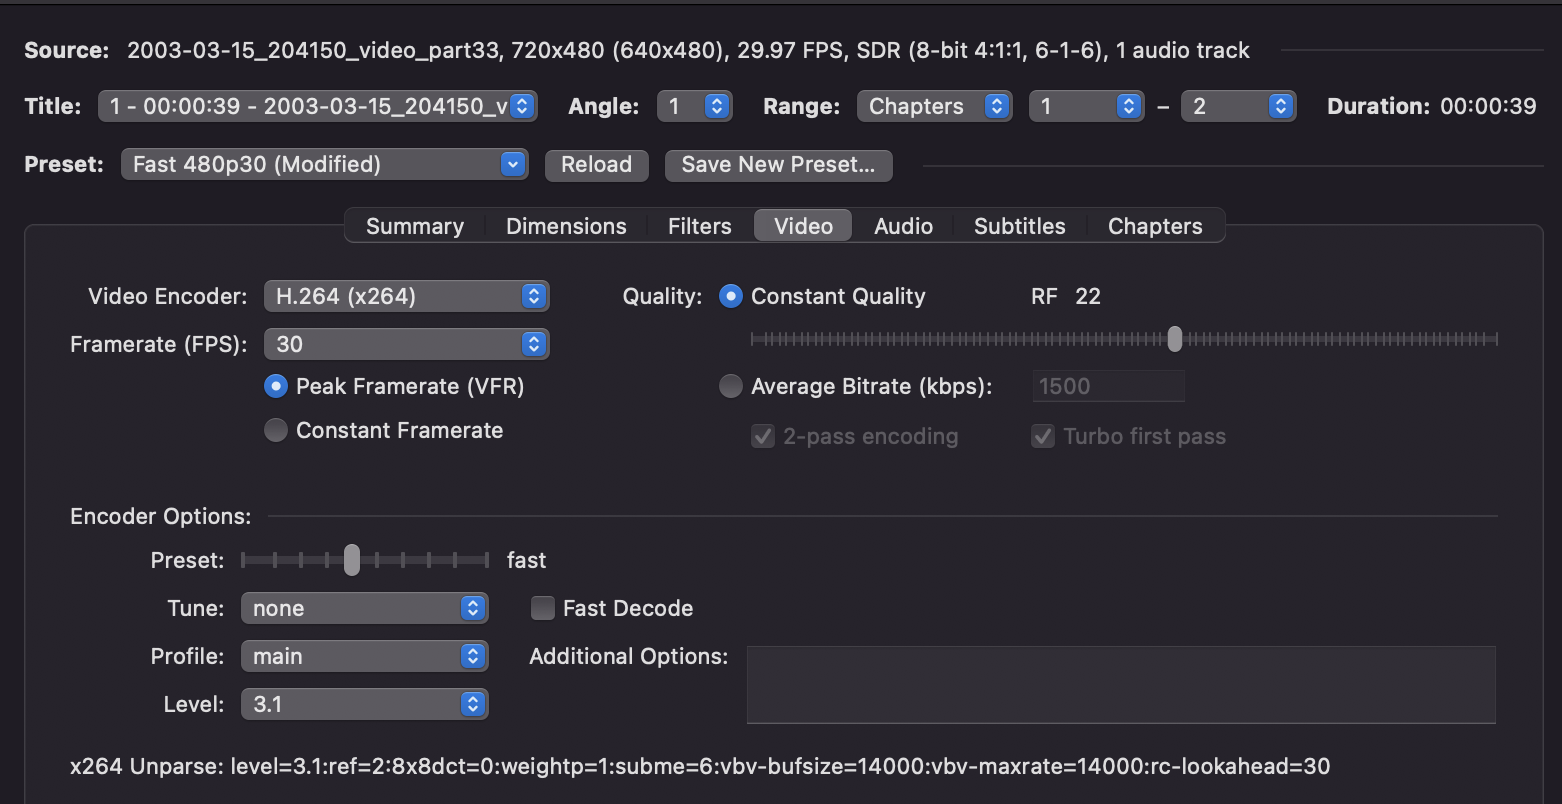
I used its 480p30 fast encoder for my footage. This compressed a 2GB file down to 246MB without a visible loss in quality.
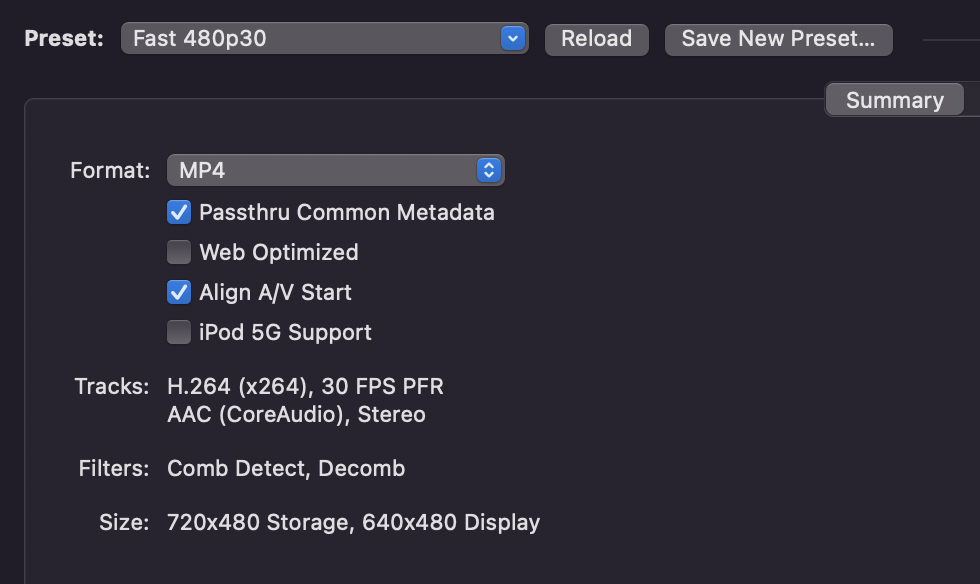
Here’s what I’m using for video settings. Peak framerate doesn’t really matter; it allows you to have an input video source with a mix of different framerates, but mine is 30FPS. I have that set because it’s the default and maximizes compatibility.
RF is short for “Constant Rate Factor,” and is essentially a measure of video quality. Handbrake recommends an RF of 18-22 for 480p video, so I set mine to 22.
Update, 3/17/23: I noticed that my Handbrake output files didn’t have the correct metadata. I looked into it and that checkbox is misleading; Handbrake doesn’t support passing through video recording date and there’s an open ticket to handle this.
I’m not an expert in video metadata, but, in any case, Google Photos isn’t correctly sorting my Handbrake-encoded files. I’m going to look into how viable this is with just ffmpeg directly.
Comments